
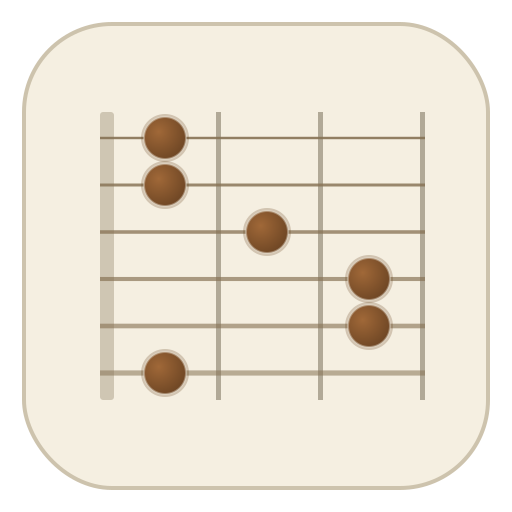

It's a picture of the neck
A chord diagram (also called a chord box or chord chart) is the neck of the guitar standing upright, facing you, with the headstock at the top. Hold your guitar up in front of you with the strings toward you and you are looking at the same thing.
The vertical lines are the strings. The thickest one, the low E, is on the left, and the thinnest, the high E, is on the right. The horizontal lines are the frets. When the top line is drawn thick, it is the nut, which means the diagram starts at the very first fret.
Here is C major, probably the first chord most people learn:
Dots and finger numbers
A dot means press that string down in that fret. Put your fingertip just behind the fret wire, on the side nearer the headstock, not on top of the wire. Close to the wire takes less pressure and buzzes less.
The number in the dot says which finger to use:
- 1 is your index finger
- 2 is your middle finger
- 3 is your ring finger
- 4 is your little finger
Some charts mark the thumb with a T, for shapes where it wraps over the top of the neck to fret the low E string. The finger numbers are a suggestion, not a rule. They are the fingering most players use, and usually the one that makes the next chord easiest to reach, but hands differ.
On Fretboard's diagrams the root of the chord, the note it is named after, is drawn in a different colour, and the note each string sounds is printed under the box. That makes it easier to see why a shape is the chord it is, and which string to aim your strum from.
Circles and crosses
Above the nut, each string gets one of two marks, or nothing if a dot is already on it:
- ○ means play the string open, without fretting it.
- × means don't play the string. Either skip it with your pick or touch it lightly with a fretting finger so it makes no sound.
In the C shape above, the low E has a cross, so the strum starts on the A string. D major crosses out the two lowest strings, so it starts on the open D. Hitting a muted string by mistake is a common reason a new chord sounds off: strum the open low E under a D shape and E becomes the bass note, which makes it a different chord.
Barres
A long bar across several strings is a barre: one finger, usually the index, laid flat to hold down all of those strings at the same fret. F major at the first fret is the barre chord most people meet first. The index finger covers all six strings, and the other three fingers make an E major shape in front of it.
A shorter bar over two or three strings is a partial barre. In A-shape barre chords the ring finger often flattens across the D, G and B strings rather than using three separate fingers. The guide to barre chords has more on making them ring.
Shapes higher up the neck
When a shape sits higher than the first few frets, the nut is left off and a fret number appears beside the top row, like 5fr. That row is the 5th fret, the next one down is the 6th, and so on. Here is D major played as an A-shape barre with its root on the 5th fret:
Count frets from the nut, not from the fret markers. The dots on the side of the neck usually sit at the 3rd, 5th, 7th, 9th and 12th frets, so the 5th-fret dot is a quick landmark for a shape like this one.
The written shorthand: x32010
Chord charts in song sheets and forums often skip the picture and write the shape as six characters, one per string, from the low E to the high E. A number is the fret, 0 is open, and x is muted. So:
| Chord | Shorthand | Read as |
|---|---|---|
| C | x32010 | low E muted, A 3rd fret, D 2nd, G open, B 1st, high E open |
| G | 320003 | low E 3rd fret, A 2nd, D, G and B open, high E 3rd |
| D | xx0232 | low E and A muted, D open, G 2nd, B 3rd, high E 2nd |
Once a shape goes past the 9th fret, each fret needs two digits, so they are separated with dashes or spaces: x-10-12-12-12-10 is G major as an A-shape barre at the 10th fret, an octave above the root of the open G shape.
Getting a new shape to sound right
- Place one finger at a time, lowest string first, and check each note rings before you add the next.
- Then pick through the chord one string at a time. A note that buzzes needs more pressure or a fingertip closer to the fret wire. A note that thuds is being touched by a neighbouring finger, so arch that finger more.
- Keep your thumb behind the neck, roughly behind your middle finger. That lets the fingertips come down on the strings from above instead of leaning.
- When you're not sure you have the shape right, put it on the fretboard. It names whatever you've fretted, so a wrong note shows up as a different chord name, and you can play it back to hear what it should sound like.
Every chord in the chord library uses these same diagrams, starting with the easiest shape and working up the neck.